If you’ve ever owned an excavator or bulldozer, you know the undercarriage is not just “tracks and rollers”. It’s a complete system that dictates machine availability. In my experience, over 70% of track-type machine downtime can be traced to undercarriage neglect — and yet it’s the most predictable failure if you understand the wear mechanisms.
The real components (and what kills them)
A full undercarriage system includes:
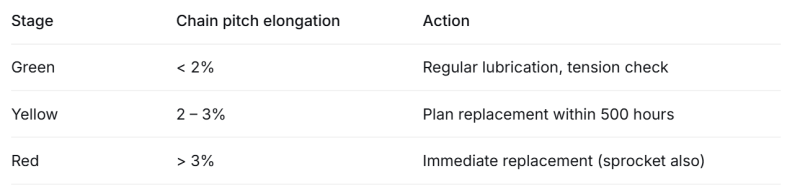
- Track chains (rails) – Heat-treated steel pins and bushings. The #1 killer is internal pin/bushing wear caused by abrasives (sand, silica). Once pitch elongation exceeds 3%, sprocket jump starts.
- Track shoes – For soft ground, wide shoes reduce compaction; for rock, narrow double-grouser shoes prevent bending. Most broken shoes come from frozen mud or hidden boulders.
- Bottom rollers & carrier rollers – Fail from leaking oil seals. A dry roller lasts only 200–300 hours before seizing.
- Idlers – Front idlers take impact. Bent flanges = misalignment = accelerated chain wear.
- Sprockets – They should wear before the chain. If you see sharp sprocket tips, you’ve already damaged the bushings.
The 3-stage wear model I use with customers
Real case: A contractor in Arizona kept running a D6 dozer until track jumped. The result: cracked final drive housing — $18,000 repair vs a $3,500 undercarriage rebuild.
Daily checklist (from my field notebook)
- Check track tension – too tight = power loss & roller flange wear; too loose = throw track. Sag should be 30–50mm (measure under top carrier roller).
- Listen for “dry roller squeal” – replace any roller that doesn’t turn freely.
- Look for “smiling teeth” on sprockets – once the tip is thinner than 10mm, reverse or replace.
Pro tip for buyers
Aftermarket undercarriage is fine, but always ask for hardness test reports (HRC 52-56 for pins/bushings, HRC 48-52 for rollers). Cheap Chinese rollers often fail in 400 hours; quality ones last 2000+.
2. Rubber Tracks: The Silent Profit Killer on Compact Equipment
I’ve seen mini excavator owners buy rubber tracks three times a year because they treat them like steel tracks. Rubber tracks are consumables with a different physics.
Anatomy of a rubber track
- Rubber compound – Natural rubber for flexibility, SBR for wear resistance. For demolition/rock, you need > 65% SBR + steel cord reinforcement.
- Steel cord (core) – Usually 4–6 layers. Once a cord is cut (by rebar or sharp rock), the track will snap within 50 hours.
- Drive lugs – Match the sprocket pitch exactly. Wrong lug pattern = rapid stripping.
Most common failures (and why they happen)
- Missing / torn lugs – Usually from driving on crushed concrete or asphalt with embedded steel. The lugs get sheared. Solution: Use rubber tracks with chevron lug design for better self-cleaning.
- Cut carcass – Side cuts happen when turning on rubble. Teach operators to lift the blade and turn slowly on hard surfaces.
- Heat cracking – Running on high-traction surfaces (road) for more than 1 km overheats the rubber. That’s why “roadliner” tracks exist (harder compound, less vibration).
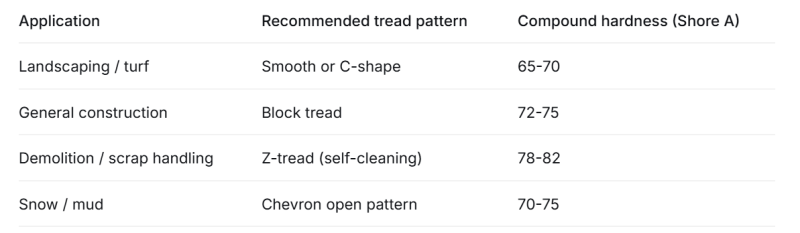
How to select rubber tracks (my cheat sheet)
Field life extension
- Maintain air pressure – Underinflation (below 20 psi) causes heat buildup. Overinflation (above 35 psi) increases cut risk.
- No zero-radius turns on asphalt – That’s like sandpaper on rubber. Make wide turns.
- Remove stones daily – Use a pry bar. A embedded stone will work its way to the steel cord.
One metric that matters: Cost per hour = (track price) / (hours until first cord break). Cheap tracks may cost $800 and last 400 hours ($2/hr). Good tracks cost $1200 but last 800 hours ($1.50/hr). Always calculate.
3. Ground Engaging Tools (G.E.T.): The Art of Matching Metal to Dirt
I’ve sold GET for limestone, granite, clay, frozen ground, and even abrasive slag. The single biggest mistake: using one tooth type for every material. That’s like using a butter knife to cut a tree.
The GET family (beyond just teeth)
- Bucket teeth & adapters – The tip is the wear part. Adapters should last 4-6 tip changes.
- Cutting edges – For loaders, reversible edges give double life.
- Shrouds & wear plates – Protect the bucket’s side bars and bottom.
- Heel shrouds – Most overlooked. Without them, the bucket heel wears into a hole.
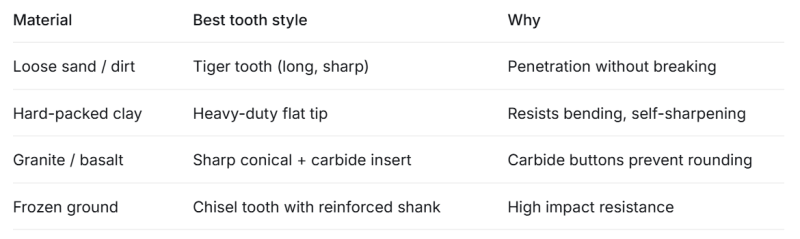
Material-specific tooth geometry
Wear life predictability (from my database)
In abrasive silica sand, a standard tooth lasts 80-120 hours. Switching to a through-hardened alloy (HB 450+) can double that to 200 hours. But you must also match the adapter — cheap adapters wear out the retaining pin hole, causing tooth loss.
Real story: Copper mine in Chile
They were changing teeth every 60 hours. I suggested switching to a two-part tip with tungsten carbide insert and a vertical pin retention (instead of rubber lock). Life went to 180 hours. But the adapter cost 40% more — still net savings of $3500 per month per excavator.
Maintenance mistakes I see daily
- Letting teeth wear to the adapter – Then you have to cut the adapter off. Change teeth when the wear indicator hole disappears.
- Mixing brands – Caterpillar K-series adapter + aftermarket tooth = loose fit, broken lugs. Always match system.
- No rotation plan – On loaders, rotate the cutting edge every 100 hours. On excavators, rotate teeth from center to corners.
Pro tip: GET hardness is not everything
Very hard (HRC 55+) GET is brittle. For rock with hidden boulders, you want toughness (impact resistance). Look for “dual hardness” teeth — hard surface, softer core.